Pros and cons of Jest snapshot tests
Have you ever heard about Jest snapshot tests? They can be used to test the application’s components written in React. They can be truly helpful indeed but sometimes can also generate some problems. The article is a presentation of some pros and cons of Jest snapshot tests based on some real-life scenarios I’ve faced during one of my projects.
It would be good to start with explaining what are snapshot tests. So, Jest provides a snapshot mechanism which allows you to create whether node or components’ tree and store it in specialized files. On every run, a tree generated by Jest (whilst creating snapshot) is compared to the one which is stored in the latest snapshot. This kind of tests can help you develop a better application. But at the same time, it can generate some problems. Below, I’ll present some pros and cons of Jest snapshot tests. I will also point out some tips and tricks you can use. Everything which is described in this article is based on my thoughts and experience.
Advantages
1. Jest snapshot tests can be written faster than traditional ones
Snapshots with their simplicity can speed up the creation of unit tests. It’s because you neither have to look for the elements in a tree nor check the amount of the elements with expected number (like in a traditional way of testing components). It’s possible because, at most times, you receive exactly the same tree which is rendered in your application and you can check if the output matches the expected result. Let’s compare a traditional unit test and Jest snapshot test to check whether you receive the same information.
| import React from ‘react‘; | |
| import { mount } from ‘enzyme‘; | |
| import { UsersComponent } from ‘./users.component‘; | |
| const data = [ | |
| { | |
| id: ‘5c76f0b7bb5c210da0f8554a‘, | |
| firstName: ‘Florine‘, | |
| lastName: ‘Russell‘, | |
| email: ‘florine.russell$email..org‘, | |
| }, | |
| ]; | |
| describe(‘Users component‘, () => { | |
| //Snapshot way | |
| it(‘renders list with one row‘, async () => { | |
| const fetchUsersList = jest.fn(() => new Promise(resolve => resolve(data))); | |
| const wrapper = mount(<UsersComponent fetchUsersList={fetchUsersList}/>); | |
| wrapper.update(); | |
| expect(wrapper).toMatchSnapshot(); | |
| }); | |
| //Traditional way | |
| it(‘renders list with one row without snapshot‘, async () => { | |
| const fetchUsersList = jest.fn(() => new Promise(resolve => resolve(data))); | |
| const wrapper = mount(<UsersComponent fetchUsersList={fetchUsersList}/>); | |
| wrapper.update(); | |
| expect(wrapper.find(‘h1‘).length).toBe(1); | |
| expect(wrapper.find(‘h1‘).text()).toBe(‘List of 8 users‘); | |
| expect(wrapper.find(‘button‘).length).toBe(1); | |
| expect(wrapper.find(‘button‘).text()).toBe(‘add new user‘); | |
| expect(wrapper.find(‘ul‘).children().length).toBe(8); | |
| //… | |
| }); | |
| }); |
 by
by As you can see in this example – snapshot is a single line in comparison to the traditional method. You receive a lot more information about the rendered list. In a snapshot, you exactly know what is in the header, in the button and in the list. Also, you don’t have to check it manually step by step. Next advantage of Jest snapshot tests is that you don’t have to change your test when you update the components. It’s because Jest updates the snapshot for you once you agree for that. Of course, you should be careful about this feature.
2. Jest Snapshot tests check if your component behaves correctly
Jest with snapshots gives you a powerful tool which allows you to check how your components behave once you pass various combinations of props to them. It helps you check if the passed data is properly reflected in the component or node tree. Also, you can check if the values are correct. You’re able to combine elements from the traditional way of testing like mocking functions which are passed as props. You can check if component called it as you expected. For example: if you want to check whether your component called the fetch function properly. It renders information about the fact that it’s fetching the data from the API. You can easily check the scenario like this in a few lines.
| import React from ‘react‘; | |
| import { mount } from ‘enzyme‘; | |
| import { UsersComponent } from ‘./users.component‘; | |
| const data = [ | |
| { | |
| id: ‘5c76f0b7bb5c210da0f8554a‘, | |
| firstName: ‘Florine‘, | |
| lastName: ‘Russell‘, | |
| email: ‘florine.russell$email..org‘, | |
| }, | |
| ]; | |
| describe(‘Users component‘, () => { | |
| it(‘renders list loading and then list with one row‘, async () => { | |
| const fetchUsersList = jest.fn(() => new Promise(resolve => resolve(data))); | |
| const wrapper = mount(<UsersComponent fetchUsersList={fetchUsersList}/>); | |
| await expect(fetchUsersList).toHaveBeenCalled(); | |
| wrapper.update(); | |
| expect(wrapper).toMatchSnapshot(); | |
| }); | |
| }); |
3. Jest snapshot allows conditional rendering tests
This point is related to the previous one, but I want to emphasize that it’s a really helpful and important case. Our applications are built in a way that certain data or functionalities are visible and accessible for users according to their permissions, roles etc. That’s why we want to check if our components behave correctly in all cases.
After receiving backend data, sometimes you need to check if a key value (i.e.: name or surname) is present (if not – you may want to display a placeholder). It can be checked with snapshots. You are able to see the results in the snapshot file. For some of you – it’s obvious but sometimes we forget about this possibility. In an example below, there’s a test for table row component with two cases. One with full user data and the other with no email field. Both can be checked in an easy way.
| import React from ‘react‘; | |
| import { render } from ‘enzyme‘; | |
| import { UsersListRow } from ‘./users-list-row.component‘; | |
| const data = [ | |
| { | |
| id: ‘5c76f0b7bb5c210da0f8554a‘, | |
| firstName: ‘Florine‘, | |
| lastName: ‘Russell‘, | |
| email: ‘florine.russell$email..org‘, | |
| }, | |
| ]; | |
| describe(‘Users list row component‘, () => { | |
| it(‘renders row with full user data‘, () => { | |
| const wrapper = render(<UsersListRow user={data[0]} />); | |
| expect(wrapper).toMatchSnapshot(); | |
| }); | |
| it(‘renders row with placeholder for email‘, () => { | |
| const { email, …user } = data[0]; | |
| const wrapper = render(<UsersListRow user={user} />); | |
| expect(wrapper).toMatchSnapshot(); | |
| }); | |
| }); |
Disadvantages
1. There are some problems with larger snapshots
Snapshots are efficient, but only when they are small and everyone can read them from the top to the bottom. Snapshots fulfill their goal only when you can easily check what has been changed in comparison to the previous version. It’s not a reason to be proud, but in my current project, we have some snapshot files with almost 4000 lines. 
This number shows how big the problem is and how important it is to solve it somehow. To control cases like this, we use the eslint plugin which is named `no-large-snapshots`. It allows you to set the limit of lines in the snapshot files, so you can easily find components which can be split into smaller ones or you should rethink your tests which use snapshots.
In my opinion, the source of this problem is that we use renderer which creates a full elements tree and renders all components. But this isn’t necessary. In almost all cases, components which are used to build a bigger part of an application has own test so you don’t have to test it twice. The important part, in this case, is that you should check if the props (if required) are passed properly to the component that you used. You can achieve it by mocking the component or use shallow render. However, it’s worth remembering that mocking a few components may be confusing at times and can lead to some new problems.
I’d like to present you a small example of how you can find a weak point with snapshots in your component and how it renders values. The exemple of component is a list which renders users data. For this component, I created a simple test where I used a snapshot. Also, I installed and configured the plugin for eslint which I mentioned before. The maximum size of my snapshot is set to 15 lines.
| import React, { Component } from ‘react‘; | |
| export class UsersList extends Component { | |
| render() { | |
| const { users } = this.props; | |
| return ( | |
| <ul> | |
| {users.map(user => ( | |
| <li key={user.id}> | |
| <div> | |
| <strong>user name</strong> | |
| {`${user.firstName} ${user.lastName}`} | |
| </div> | |
| <div> | |
| <strong>email</strong> | |
| {user.email} | |
| </div> | |
| </li> | |
| ))} | |
| </ul> | |
| ); | |
| } | |
| } |
| import React from ‘react‘; | |
| import { render } from ‘enzyme‘; | |
| import { UsersList } from ‘./users-list.component‘; | |
| const data = [ | |
| { | |
| id: ‘5c76f0b7bb5c210da0f8554a‘, | |
| firstName: ‘Florine‘, | |
| lastName: ‘Russell‘, | |
| email: ‘florine.russell$email..org‘, | |
| }, | |
| ]; | |
| describe(‘Users list component‘, () => { | |
| it(‘renders list with one row‘, () => { | |
| const wrapper = render(<UsersList users={data} />); | |
| expect(wrapper).toMatchSnapshot(); | |
| }); | |
| }); |
| //package.json – create-react-app | |
| { | |
| //… | |
| “eslintConfig“: { | |
| //… | |
| “rules“: { | |
| “jest/no-large-snapshots“: [ | |
| “warn“, | |
| { | |
| “maxSize“: 15 | |
| } | |
| ] | |
| }, | |
| } | |
| //… | |
| } |
Once I ran the tests and Jest created the snapshot file, I can check the snapshot files length with eslint with command yarn eslint src/**/*.snap. The eslint output is a message that snapshot file is too long and you should fix it.
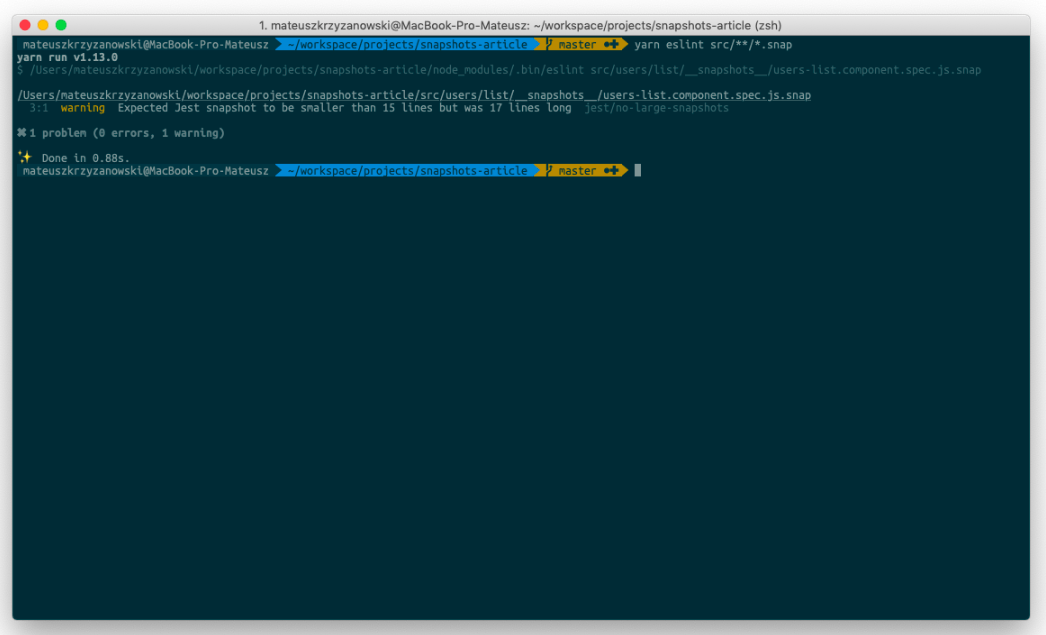
I proposed two solutions for this kind of cases a few lines above. Below, I present both of them. I wanted to test the list and the main information is that I wanted to know how many rows the list will render and what kind of data is passed to the specific row. The first and simplest solution is that I can replace render by shallow. So, I did that and I verified it with updated Jest snapshot. Then I checked it with eslint.
| import React from ‘react‘; | |
| import { shallow } from ‘enzyme‘; | |
| import { UsersList } from ‘./users-list.component‘; | |
| const data = [ | |
| { | |
| id: ‘5c76f0b7bb5c210da0f8554a‘, | |
| firstName: ‘Florine‘, | |
| lastName: ‘Russell‘, | |
| email: ‘florine.russell$email..org‘, | |
| }, | |
| ]; | |
| describe(‘Users list component‘, () => { | |
| it(‘renders list with one row‘, () => { | |
| const wrapper = shallow(<UsersList users={data} />); | |
| expect(wrapper).toMatchSnapshot(); | |
| }); | |
| }); |
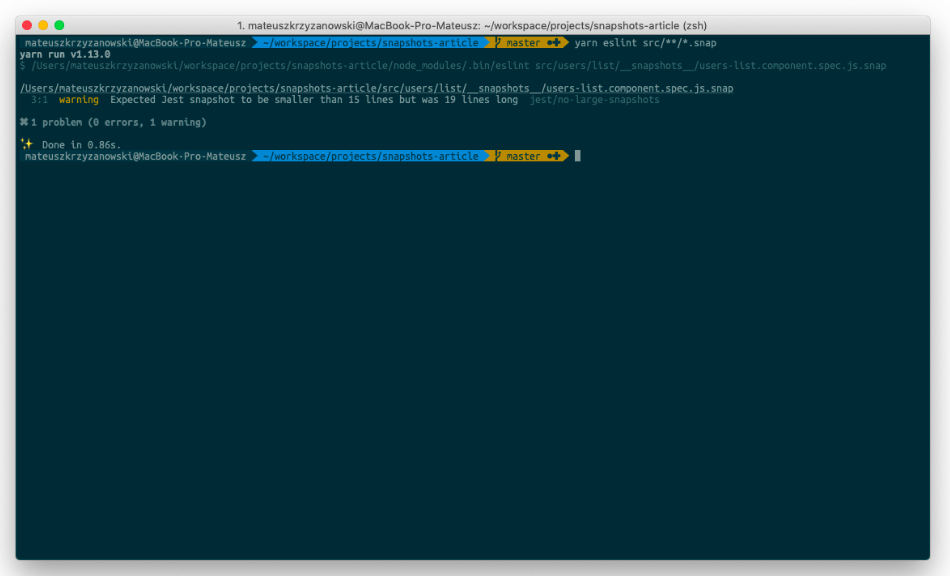
Oops… something went wrong because the snapshot file is even longer than before. So in this situation, you should check UsersList component. This is the case where snapshot helps to find places where you can split the component into smaller parts. After a few looks on the component, I noticed that it’s possible to extract the row to the separate component and create a test for the new component. After that change, I ran Jest, then updated the snapshot files and verified snapshots length.
| export class UsersList extends Component { | |
| render() { | |
| const { users } = this.props; | |
| return ( | |
| <ul> | |
| {users.map(user => ( | |
| <UsersListRow user={user} key={user.id} /> | |
| ))} | |
| </ul> | |
| ); | |
| } |
| import React from ‘react‘; | |
| export const UsersListRow = ({ user }) => ( | |
| <li> | |
| <div> | |
| <strong>user name</strong> | |
| {`${user.firstName} ${user.lastName}`} | |
| </div> | |
| <div> | |
| <strong>email</strong> | |
| {user.email} | |
| </div> | |
| </li> | |
| ); |
Now the eslint is “happy” – so am I. It’s because I reduced the length of the snapshot file and save details about the specific row. Now, I can read it from the top to the bottom easily.
| // Jest Snapshot v1, https://goo.gl/fbAQLP | |
| exports[`Users list component renders list with one row 1`] = ` | |
| <ul> | |
| <UsersListRow | |
| key=”5c76f0b7bb5c210da0f8554a” | |
| user={ | |
| Object { | |
| “email”: “florine.russell$email..org”, | |
| “firstName”: “Florine”, | |
| “id”: “5c76f0b7bb5c210da0f8554a”, | |
| “lastName”: “Russell”, | |
| } | |
| } | |
| /> | |
| </ul> | |
| `; |
The second solution for solving the problem of large snapshots is mocking selected component with custom implementation without changing the render method. I change the render method from shallow to render and I left the extracted row component. Also, I created a mock for `UsersListRow` component like below and then updated snapshots.
| import React from ‘react‘; | |
| import { render } from ‘enzyme‘; | |
| import { UsersList } from ‘./users-list.component‘; | |
| const data = [ | |
| { | |
| id: ‘5c76f0b7bb5c210da0f8554a‘, | |
| firstName: ‘Florine‘, | |
| lastName: ‘Russell‘, | |
| email: ‘florine.russell$email..org‘, | |
| }, | |
| ]; | |
| jest.mock(‘./row/users-list-row.component‘, () => ({ | |
| UsersListRow: props => <li>{JSON.stringify(props, null, 2)}</li>, | |
| })); | |
| describe(‘Users list component‘, () => { | |
| it(‘renders list with 1 row‘, () => { | |
| const wrapper = render(<UsersList users={data} />); | |
| expect(wrapper).toMatchSnapshot(); | |
| }); | |
| }); |
| // Jest Snapshot v1, https://goo.gl/fbAQLP | |
| exports[`Users list component renders list with 1 row 1`] = ` | |
| <ul> | |
| <li> | |
| { | |
| “user”: { | |
| “id”: “5c76f0b7bb5c210da0f8554a”, | |
| “firstName”: “Florine”, | |
| “lastName”: “Russell”, | |
| “email”: “florine.russell$email..org” | |
| } | |
| } | |
| </li> | |
| </ul> | |
| `; |
In this case, only the row component is mocked and all the other components are rendered as they should be.
2. Sometimes, there are issues with translations
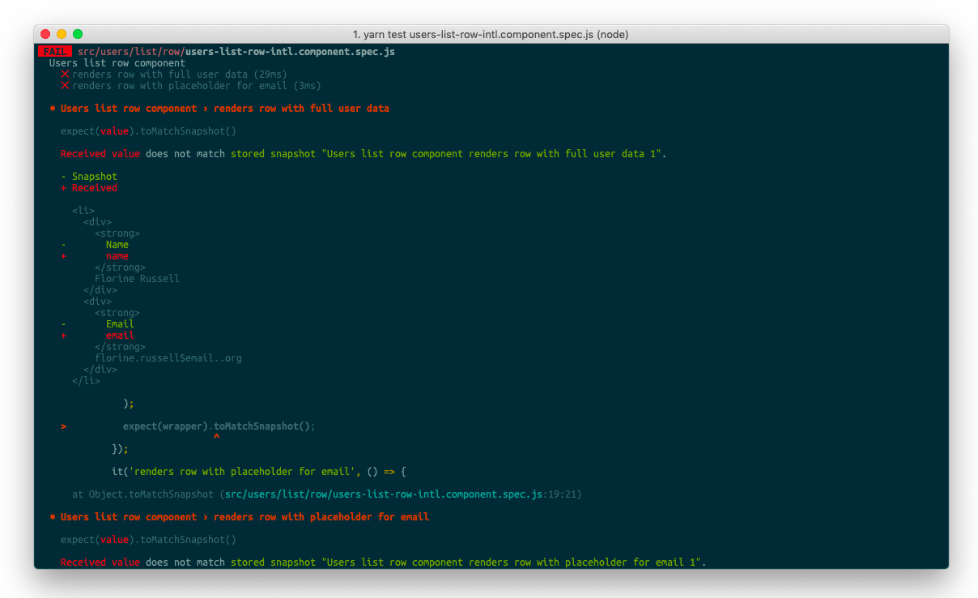
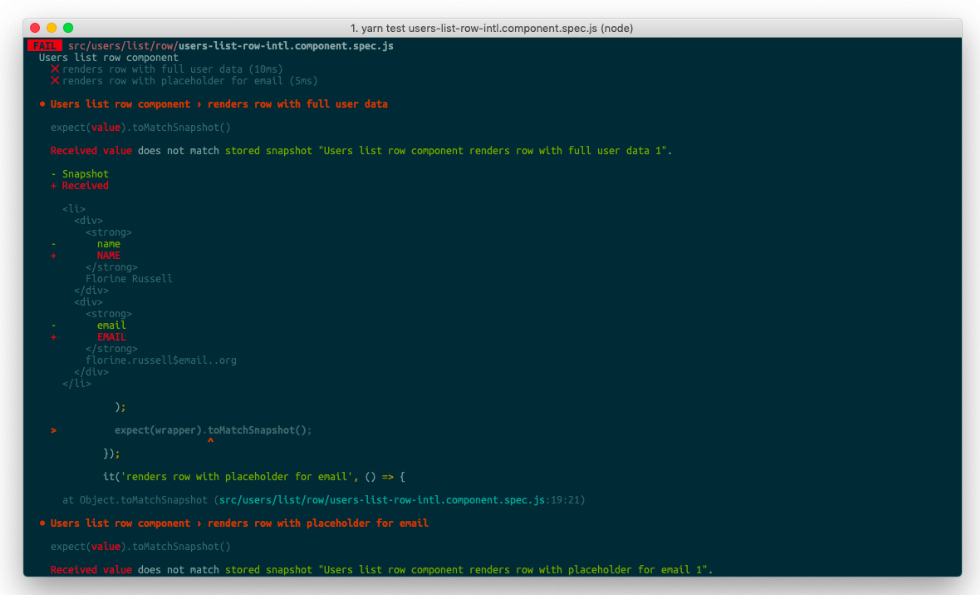
A lot of applications have more than one language. In my current project, we have the same situation. To provide a multi-language app, we use the tool developed by The Software House – BabelSheet. It allows you to generate a file with translations from Google Sheet. To display correct text on the interface, we use `react-intl`. This is a really good toolset when you are working on a multi-language application. Every time the translations are updated, our snapshots fail, even if we didn’t change the source code. To solve this issue we decided to mock the whole `react-intl` package with `genMockFromModule`. I recommend to do the same – it saves a lot of time and helps avoid failed tests.
To present the problem with the changing translations, I prepared a simple example where I used extracted row from the list which I created before. I modified it by adding `react-intl` to provide translations for the labels.
| import React from ‘react‘; | |
| import { FormattedMessage } from ‘react-intl‘; | |
| export const UsersListRow = ({ user }) => ( | |
| <li> | |
| <div> | |
| <FormattedMessage tagName=“strong“ id=“NAME“ /> | |
| {`${user.firstName} ${user.lastName}`} | |
| </div> | |
| <div> | |
| <FormattedMessage tagName=“strong“ id=“EMAIL“ /> | |
| {user.email} | |
| </div> | |
| </li> | |
| ); |
In this case, when the translation is changed – the snapshot fails, even if the component hasn’t changed. When your client has access to the source of translations, the tests may fail unexpectedly when the source files of translations are changed.
The best solution for this case is to mock `react-intl` in that way it always returns the ID of translation or object with ID and translation values, not its value. An additional benefit of this solution is that you don’t have to wrap your component in every test with `IntlProvider`. We use the mock (presented below) in a few projects. For more information, you can visit the react-intl documentation website.
| import React, { Fragment } from ‘react‘; | |
| const Intl = jest.genMockFromModule(‘react-intl‘); | |
| const intl = { | |
| formatMessage: ({ id, values }) => { | |
| if (values) { | |
| return JSON.stringify({ id, values }); | |
| } | |
| return id; | |
| }, | |
| locale: ‘en‘, | |
| }; | |
| Intl.injectIntl = Node => { | |
| const renderWrapped = props => <Node {…props} intl={intl} />; | |
| renderWrapped.displayName = Node.displayName || Node.name || ‘Component‘; | |
| return renderWrapped; | |
| }; | |
| Intl.FormattedMessage = ({ id, tagName: TagName = ‘span‘, values, children }) => { | |
| const valuesString = !!values | |
| ? Object.entries(values || {}).map(([key, value], index) => { | |
| if (React.isValidElement(value)) { | |
| return <Fragment key={index}>{value}</Fragment>; | |
| } else { | |
| return JSON.stringify({ [key]: value }); | |
| } | |
| }) | |
| : [null]; | |
| if (typeof children === ‘function‘) { | |
| return children(id, …valuesString); | |
| } | |
| return ( | |
| <TagName> | |
| {id} | |
| {valuesString} | |
| </TagName> | |
| ); | |
| }; | |
| Intl.IntlProvider = props => <>{props.children}</>; | |
| module.exports = Intl; |
Tips
1. It’s good to avoid ‘renders correctly’ snapshots
When you are creating a new snapshot, you should avoid naming it `renders correctly`. It’s an example in Jest documentation, but this name doesn’t say anything about the purpose of this particular test. What does `renders correctly` mean? You should rather create names which describe the purpose of your snapshot. For example: “renders two rows with data” or “renders with prop A with value B” and so on.
2. You should always control your work
When you are working on some part of the application or you are fixing something, you always receive information about possible errors in the existing code. They can help you detect unexpected changes in different parts of the application after you introduce any changes, so you can double-check if the changes are good and if they work as you expected. Before you update a snapshot, you should check if all the changes are desired after code modification.
Summary
Snapshots can simplify your work and provide details about the code that you created. They also can be the documentation of the components you’ve used. Also, they can point out the spots where your application probably could be better when the snapshot is too big. Problems are a source of developers work. Why can’t we treat tests issues like a problem to solve rather than saying that “tool X is bad – don’t use it”.
Maybe we should consider if we are using the tool in a good way? Maybe we should change the way we are using it? Jest snapshot tests is a method which can speed up testing and provide more details in fewer lines of code. However, you shouldn’t treat them like a substitute for other approaches for testing components. I think we should always try to solve problems that we meet and think about the source of them – it makes us better developers.


